Several people have enquired as to how I photographed ‘Lightning Approaches Koh Tao’. There seems to be a widely-held misconception when it comes to capturing lightning, so what better opportunity to write my first tutorial?
Lightning Approaching Koh Tao
In this article I’ll concentrate mainly on the shooting aspect of making this photograph. I didn’t record my post-processing steps so I won’t be going into great detail. Maybe one for the future!
I’m fortunate enough to live in a bungalow with nothing between the balcony and the sea but a few rocks. If a storm’s rolling in from the west (and I’m not in the bar), I’m going to see it coming. Of course, I didn’t rent the place for it’s storm-spotting potential, but I can’t stress how important it is to be in the right place and to have your gear ready to go at a moment’s notice when it comes to lightning photography.
Before dusk I’d spotted some large Cumulonimbus clouds building on the horizon so I already knew there was a possibility we’d get some action. Long after dark the evening was still but regular flashes and distant rumbling suggested a storm was heading my way. I watched from the balcony for a short time to gauge its direction and where the lightning was most prolific. By luck it was heading southwest-northeast, on a track directly towards me. At first I tried photographing from there, knowing that I’ll likely soon be running from the deluge, but tree-branches obscured part of the scene. Instead I hurried to the rocks below where I could make a stronger composition, albeit in near darkness.
Equipment:
I won’t tell you that you need a particular camera, but there are a few important considerations you need to make when it comes to equipment. Most importantly, you’ll need a sturdy tripod. The more stable your tripod, the sharper any landscape picture will be and remember the wind is likely to build dramatically as the storm closes in. I used a MeFOTO RoadTrip Carbon Fibre and matching ball-head. This tripod is a compromise, I needed something small and lightweight for travel. I’d much prefer something larger with greater stability but for what it is, I’m suitably impressed. You’re going to need a shutter-release cable for your camera which allows you to shoot without introducing any shake on the camera. If you don’t have one, you may be able to use the 2-second timer function on your camera or you might even have a smartphone app to trigger your camera (just remember you and your gear are likely to get very wet). Worst-case is you have to press the shutter button yourself. If you’re careful, this may not be the end of the world. A wide-angle lens will allow you to incorporate as much of the storm as possible, with space for foreground interest. The wider the lens, the more chance you have of capturing lightning within the frame. You do not need a top-end SLR camera, though if you have one handy, go for it. Most important is the cameras ability to produce low-noise images with long exposures. Generally the larger the sensor, the cleaner the image, but don’t go out and buy a full-frame body just yet, chances are your existing camera will do a good job. I happened to be using a Fuji XT-1 camera body for this image. The XT-1 only has an APS-C sized sensor but I’m seriously blown-away with the cleanliness of the images it produces. The features you need come as standard on all but the cheapest cameras, namely ‘Bulb’ mode which allows us to open and close the shutter at will and set aperture independently. I you can’t find ‘Bulb’, it may be hidden in the shutter-speed setting of Manual Exposure mode (labelled ‘M’ on your function dial). Check your cameras documentation if you’re unsure. If you don’t have ‘Bulb’ mode, you’ll need to use Manual and set shutter-speed for as long as possible. Many cameras limit this to 30-seconds – not ideal but certainly useable, so don’t be put off. We’ll need to focus manually too – there’s no room for automatic anything in lightning photography! Some nice-to-haves: Long Exposure Noise Reduction. With this enabled, when the shutter closes, the camera takes a ‘dark frame’, essentially a photo with the same settings but completely dark. The camera is then able to use the digital noise recorded in the dark frame to remove it from your image. The compromise here is that most cameras become inoperable while the dark slide is exposing, for the exact amount of time as it took to expose your picture – that might mean a lot of missed lightning! I have it enabled as standard. If you decide you don’t want to miss the lightning, or your camera doesn’t have the function, it’s quite possible to reduce noise in post-processing, so don’t panic. You’ll want to use the lowest ISO setting available, in my case that’s 200. The higher the ISO, the more noise recorded in your image. ISOs below 400 should be sufficient. The final consideration is image format. If you shoot JPEG (or JPG), you may well get a usable image but it will not offer you much latitude for post-processing. RAW is the preferred choice here, but the format requires a fair amount of processing knowledge. If you have RAW format on your camera, you’ll likely have the option to shoot RAW and JPEG simultaneously – the best of both-worlds. If you’re not ready for the art of RAW processing, you can always put the file aside for a later date. So, we’ve got our gear sorted, let’s shoot.
“How do you react so fast to capture the lightning?”
I’ve already alluded to this widely-held misconception of lightning photography. As much as I’d love to have a trigger-finger faster than the speed of light, I won’t be winning any western duels with this sluggish digit. No, we photographers are a lazy bunch. The trick is to use a long exposure to give us as much chance of capturing the lightning as possible. We open the shutter, wait for some lightning, then close the shutter, hence using Bulb mode as mentioned above. Keeping the shutter open has the potential benefit of capturing more than one lightning bolt too. Simple, huh? It’s all in the preparation and a fair amount of luck. Actually there are a few photographic principals we need to employ too.
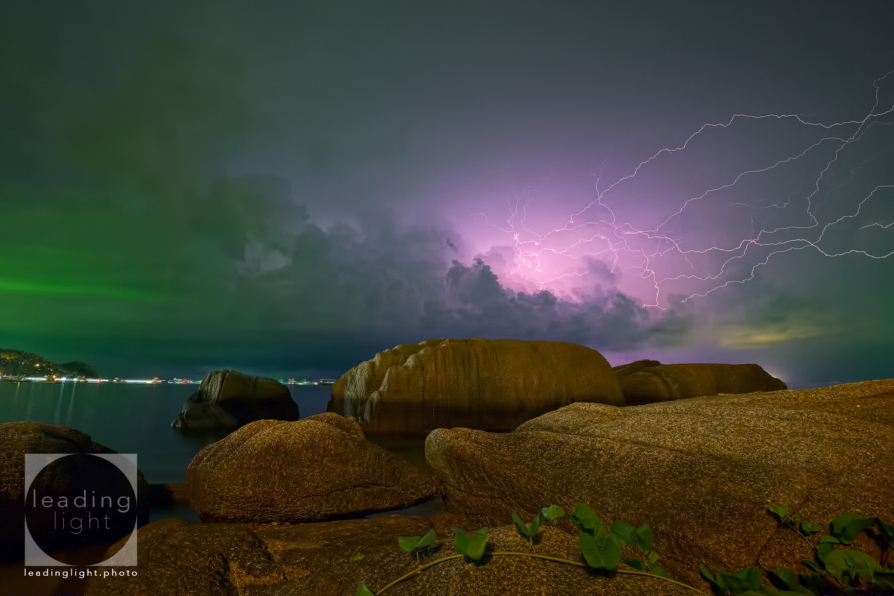
Take a look at the image above. What do we have in terms of light? We have the awesome lightning itself, which is by far the strongest light source, but the rocks are also receiving some light. This came courtesy of my balcony light behind, which I left on purposely to add some definition to the otherwise dark rock. Notice the green and yellow blotches illuminating the clouds to the left and right? That’s light pollution from a nearby town and one far in the distance respectively. These light sources are faint and barely visible to the naked eye, but very prominent in the final image. Lastly, we have the light from buildings to the left and boats all along the horizon. All of these light sources need to be controlled. I dealt with the brightest boat lights through composition; I set up the camera intentionally to hide these lights behind the rocks. Aesthetic composition came secondary to the need to hide the brightest highlights. The rest of the boats I was happy to allow to blow-out, or over-expose. They were small enough as to not detract from the scene significantly. I also later cropped the image from the left to remove some distracting highlights from the buildings, which also had the benefit of centralising the source of the lightning. Ambient light, that on the rocks and clouds, is controlled by shutter speed. Through experimentation, we decide upon a shutter speed that in combination with aperture and ISO, will expose the image correctly, but is not so long as to over expose the scene. Finally we need to deal with the lightning itself. Consider that it is an extremely bright but also brief flash of light. It’s brevity means that shutter-speed has little to no effect on it. We control the intensity of the lightning, with knowledge of our ISO setting, using aperture – a physical mechanism that restricts the amount of light entering the camera. All of these settings will vary from scene to scene, storm to storm. We use a ‘best guess’ based on our knowledge, then we shoot, check the image, adjust, re-shoot until we get it right. If we’re very lucky, we might just arrive at the correct settings when the perfect bolt of lightning appears.
So I’ve composed to get as much storm in the frame as possible, some foreground interest but also to hide some distracting lights. I’ve focussed manually to ensure I get infinity, which is where the storm’s probably at, and the foreground rocks in focus. My Fuji XT-1 has a handy tool built in to help with this but you can find tables and smartphone apps that will make this calculation easier. I know that by using a wide angle lens, I’m not going to require a particularly narrow aperture to keep all this in focus. I’m sticking with ISO 200 (for example) in order to get the cleanest image, I don’t need to worry about this any more, save to remember that it’s not going to record much light so I therefore require a longer shutter speed. Next, I need an aperture setting to control the lightning. In my experience, around f/8 is a good place to start, but this is going to vary with every lightning bolt (shoot, review, adjust, shoot, review…). My final image had an aperture value of f/10 which recorded the lighting fine but underexposed the scene a little. f/9 may have been a better choice, brightening the scene more without affecting the lightning badly, but something like f/4 would have resulted in a blown-out white sky. Lastly shutter speed… I must consider two things; how long must I keep the shutter open to have a good chance of capturing the lightning, and how long can I keep it open without overexposing the ambient light. First I make a very quick and rough estimation of the lightning’s frequency. This is the bare-minimum time I need the shutter open. Then I make an educated guess of the maximum time I can record without blowing-out the scene. Shoot, review, adjust, shoot, review… At this stage it’s worth mentioning the frustration you may cause yourself by having Long Exposure Noise Reduction enabled. You’ll lose the shutter-time again once the shot is taken – your choice, buddy. The shutter speed of this image was 240 seconds – a whole 4 minutes! I figured I needed 3 minutes to guarantee capturing some lightning. I pushed it to 4 minutes through greed; I was hoping to capture multiple lightning forks. I knew it was pushing the limits of the hardware, in terms of potential noise in the image, but I wanted to take the risk. Had I reduced shutter speed, I would have had to open up the aperture (lower f/number) to expose the scene correctly, or up the ISO, which may have introduced noise issues again. Making either of these adjustments would have overexposed the lightning if I pushed them too far. Confused? It’s easy to to get muddled as one setting affects another, but assuming ISO is fixed quite low, as long as you remember aperture mainly controls the intensity of the lightning and shutter speed affects mainly the ambient light, you shouldn’t go far wrong. Experiment.
And so having missed several impressive lightning bolts due to exposure settings and the frustration of waiting for LENR to do it’s thing, I knew I was suitably set up and continued to shoot 3-4 minute frames until nature obliged by chucking a single great fork horizontally across the sky. A couple more frames produced nothing significant and as the wind blew up and the deluge began, I retreated fast to the shelter of my bungalow to enjoy the awesome spectacle of nature’s greatest show pass overhead.
Post Processing
Once I’d transferred the images to my computer, what did I have? Actually I ended up with a rather dark underexposed image. My best attempts produced the best image possible at the time, but it needed work in post. I could have opened the aperture to around f/9 to brighten the scene but a previous shot showed that f/8 had killed the lightning. This is where shooting RAW becomes a Godsend and the XT-1 amazed me with a file that I could push a fair way without introducing unacceptable noise in the shadows. I pushed exposure up a stop or so to bring some detail into the scene and in Photoshop, layered the image and painted on masks to balance the various elements in the image. A slight vignette and some contrast adjustment drew attention to the lightning itself. Finally, cropping the left of the image removed some particularly distracting highlights on land and brought the lightning source more central. I should have composed further to the right, which also would have captured more of the lightning, but I failed to notice the highlights while shooting.
Problems
“The lightning’s overexposed the sky? how do I deal with this?”
Try closing down the aperture a stop or so (higher f/number = less light entering the camera). This might underexpose the ambient light so experiment in steps and increase the shutter speed if required. It may be that you’ve captured a particularly bright bolt, and the next may not be so bright. Perhaps you caught several over a period of time that have combined to cause overexposure. Watch and learn from the storm.
“I shot a wicked lightning bolt but the scene’s too dark”
Try increasing your shutter speed until you expose the ambient light correctly. This gives you the bonus of perhaps capturing more lightning in the same shot, but watch out for digital noise in the image. Likewise, if the scene’s too bright, you probably need to reduce shutter speed.
“What about white balance?”
If you’re shooting RAW, you can leave it on auto and adjust it later in post. If you’re shooting JPEG, try ‘daylight’, but every scene will be different. Try different temperatures and review as you shoot.
Grab Your Camera
I hope you’ve enjoyed reading this article and have learned something from it. Please feel free to post comments below. Get out there, practice patience and experiment. Bear in mind that tripods and people make very effective lightning conductors and cameras don’t like rain. Be safe, have fun.